Developer Hub
This page is your one-stop shop for all the tools and tips you need to build and deploy amazing AI solutions on the AI Innovation Platform. Here, you'll find resources to help you:
- Develop and deploy your AI models: Learn about the platform's infrastructure, APIs, and best practices for building and deploying your AI models.
- Optimize your AI workflows: Discover tools and techniques for streamlining your development process, improving model performance, and managing your AI projects effectively.
- Integrate with other services: Explore how to seamlessly connect your AI models with other services and applications within the platform.
Whether you're a seasoned AI developer or just getting started, this hub has something for you. Dive in and start building the future of AI!
Working with Jupyter Notebooks
Install Python Libraries from Jupyter Notebook Cell
Use the following code to install the libraries from notebook cells:
The above will ensure installation of python libraries in selected kernel. In case if facing issues post installation, restart the kernel and try again.Install Python Libraries from Jupyter Terminal
List conda environment > Activate conda environment > Install the Python libraries
Mount GCS Buckets
Mount Bucket in Linux
Cloud Storage FUSE is an open source FUSE adapter that lets you mount and access Cloud Storage buckets as local file systems.
Cloud Storage FUSE V2 provides important stability, functionality, and performance enhancements, including the introduction of a file cache that allows repeat file reads to be served from a local, faster cache storage of choice, such as a Local SSD, Persistent Disk, or even in-memory /tmpfs. The Cloud Storage FUSE file cache makes AI/ML training faster and more cost-effective by reducing the time spent waiting for data, with up to 2.3x faster training time and 3.4x higher throughput observed in training runs. This is especially valuable for multi epoch training and can serve small and random I/O operations significantly faster. The file cache feature is disabled by default and is enabled by passing a directory to "cache-dir".
Read below documentations to know more.
Dynamic Mount with GCSFuse ⧉
Mount Bucket as Read-Only ⧉
File Caching ⧉
Persistent Mounting of GCSFuse ⧉
Mount Bucket in Windows
Open command prompt and run the following commands to mount the GCS storage bucket.
Rclone package is placed at a location - "C:\Program Files (x86)\rclone" in 3D Slicer VMs. Lets assume we have a demo_files2 that needs to be mounted on the Slicer VM for storing annotations and loading data available from Marketplace.
cd "C:\Program Files (x86)\rclone”

"C:\Program Files (x86)\rclone\rclone.exe" mount gcs:demo_files2 C:\<new-folder> --vfs-cache-mode minimal --config "C:\Program Files (x86)\rclone\rclone.cfg"
C:\<new-folder>: Mount folder path representing a non-existent subdirectory of an existing parent directory or drive

Mount Additional Disk for Windows
You can use Windows Disk Management ⧉ to format and mount the new disk on a Windows VM.
- RDP into the VM that has the new blank disk attached.
-
Right-click the Windows Start button and select Disk Management.

-
Disk Management prompts you to select a partitioning scheme for the new disk. Select GPT and click OK.

-
After the disk initializes, right-click the unallocated disk space and select New Simple Volume.

-
Follow the instructions in the New Simple Volume Wizard to configure the new volume. You can use any partition format that you like, but for this example select NTFS. Also, check Perform a quick format to speed up the formatting process. Optionally, set the cluster size in the Allocation unit size field. The cluster size limits the maximum size of the partition ⧉. Keep this in mind if you try to resize the zonal persistent disk and this partition later.

-
After you complete the wizard and the volume is formatted, check the Status column on the list of attached disks to ensure that the new disk has a Healthy status.

You can now write files to the disk.
NOTE:
- If the disk is not attached to the VM, it won’t show any space in the volume in disk manager option as it shown in the above link.
- Only the disk which is attached to the VM at the time of its creation can be mounted to that VM.
- This section assumes the additional disk is attached to the VM through GCP.
Connect to Cloud SQL from GKE
In this section, we will discuss on how to connect to SQL instances from workloads deployed in GKE Cluster.
Authorize Networks in Cloud SQL Instances
GKE Clusters uses secondary ranges for the pods deployed on the clusters which belong to non-RFC ranges hence, we need to add the ranges used in Cloud SQL.
Navigate to Kubernetes Clusters > View Cluster Details > Navigate to Cluster Networking > Search for Cluster Pod IPv4 range (default).
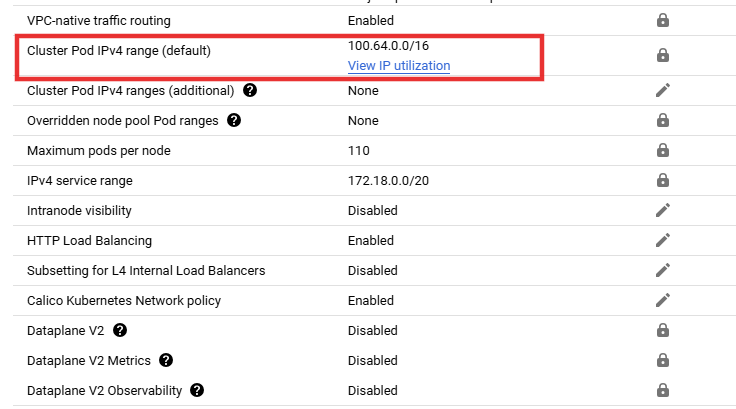
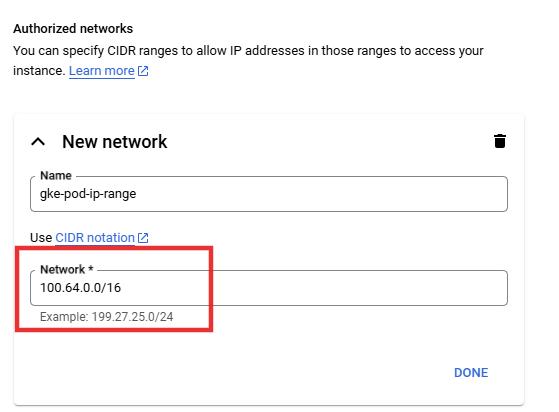
Whitelist this IP range in Cloud SQL authorized networks as shown below.
Connect to GKE
There are two ways to connect to the Cloud SQL instances:
- Host Cloud SQL Auth Proxy in GKE and then use its service endpoint to connect from the hosted application.
- Directly use Cloud SQL private IP with the SSL certificates and database user credentials from the hosted application.
Connect to Cloud SQL from Cloud Run
Authorize Networks in Cloud SQL Instances
Attach VPC serverless connectors to Cloud Run service to ensure the traffic to SQL instance is by default accessible via private IP. No additional configurations required. In case of any connectivity error, reach out to our support team.
Connect to Cloud Run
We can configure the connections as follows:
- Similar to GKE setup, we can have SQL Auth Proxy running as a side container on Cloud Run service.
- Add a dependency on your application container to wait until SQL proxy containers are running to ensure the application is not failing due to SQL connections unavailable
Refer here ⧉ to learn about hosting the Cloud SQL Proxy Agents.
Host Serverless Applications Behind Load Balancers
Serverless functions, like Cloud Functions, allow you to run code without managing servers, automatically scaling based on demand. GCP's Load Balancing service distributes traffic across your serverless functions, ensuring high availability and optimal performance. This combination empowers you to focus on your application logic, while GCP handles the infrastructure, scaling, and reliability.
Serverless Applications for Regional Setup
We can have regional backends with Load Balancers as shown below.
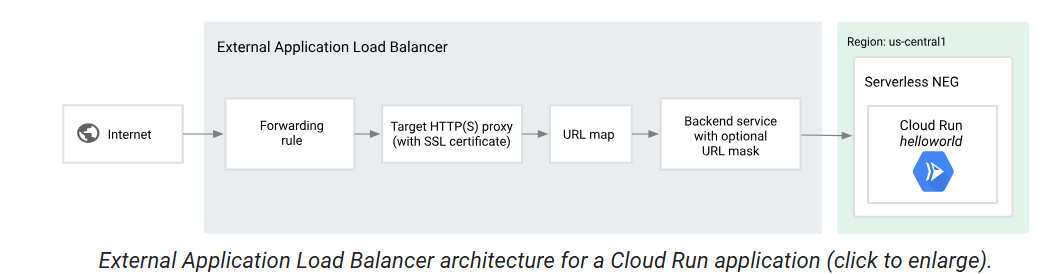 Visit here ⧉ to know more.
Serverless for Multi-regional Routing
We can have multi-regional backends with Load Balancers as shown below.
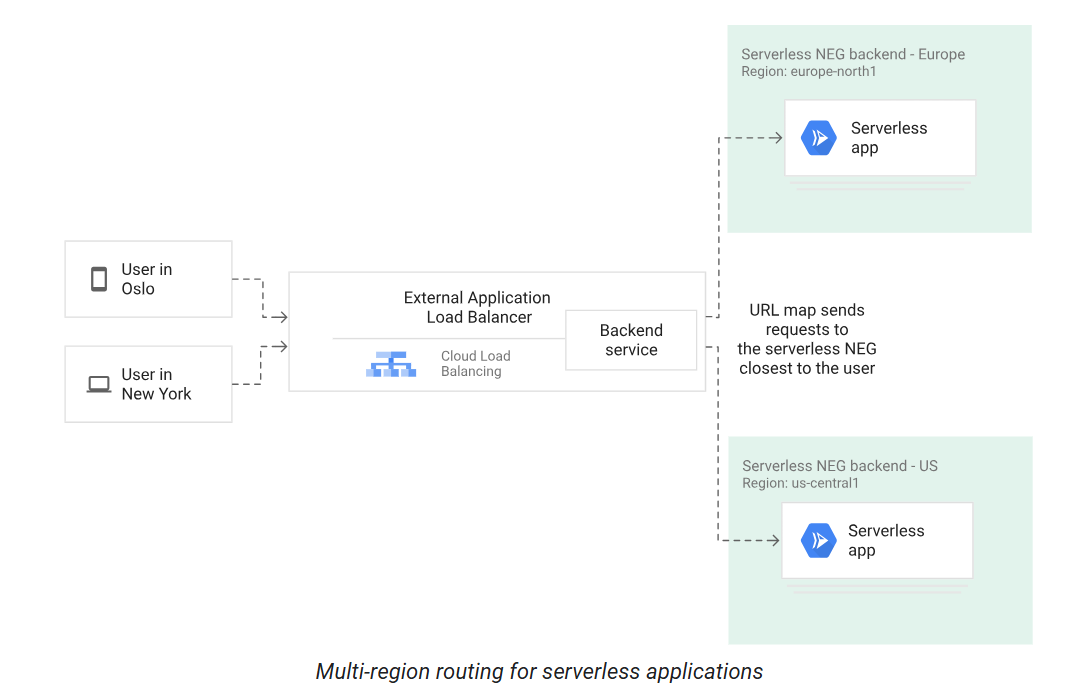 Visit here ⧉ to know more.